T3 Turbo Diesel Breather Hose – 068103493AE

We keep saying it, but we’re so lucky in the T3 world!
More and more that were made obsolete by VW years ago are becoming available every week.

These breather hoses run from the “UFO” on the rocker cover down to the inlet side of the turbo. Its common to see them split or even rubbed through, which allows the turbo to draw in all that mucky air from the engine bay.

We tired of seeing them taped up with Duct tape long ago, so paid for the tooling to allow us to produce them in Silicone (HERE). And that is what we’ve done until now.

Now they’re available as a Genuine VW part again from the original manufacturer.
We’ll still keep the Fluoro lined silicone versions as technically theyre a better product and should last longer, but these are in stock if you want 100% originality.

068103493AE

WEBSHOP LINK

On the First Day of Christmas, Brickwerks sent to me….

…Nothing.
No Partridge in a Pear Tree will be shipped.
No Lords, leaping or otherwise will be sent to anyone.
No Gold Rings, or French Hens.
And not just because we don’t sell any of that guff. We’re closed from midday on Christmas Eve, and we won’t return to work until the 11th Day of Christmas – the 4th January.

xmas2015

We’ll be shipping orders right until we close, but obviously the closer to Christmas it gets the less likely you’ll be to get a Next Day delivery 🙂
Anything shipped on Thursday should be delivered between the Christmas and New Year period.

We’ll be back in on the 4th January… no doubt a few pounds heavier, and a little “lethargic” but we’ll ship all orders placed over the festive season on that first day back and then usual service will be resumed until we do it all again next year!

All that remains is to say thanks to all our customers, old and new for your support.
Its been a fantastic year!
Enjoy the holidays, whatever you’re doing, and we’ll hopefully see you all again next year for more of the same…

T3 Waterboxer Push Rod Tube covers – Original style

We’ve sold the stainless steel reproductions of these for years, and still do…
Back in the days when the originals weren’t available they were a great replacement and an upgrade for the originals. They’re HERE if you need those.

VW Classic Parts recently reproduced the originals, and as more and more owners are restoring for originality, we figured we should also stock them.
Strange that the top quality stainless steel ones have now become the “budget” option 🙂

So, both sides available separately. Left and Right.

025109655 025109656


Seat belt upper mount


We’ve sold rear seatbelts for the T3 for a good many years now, initially designed for retro fitting into the rear of a Westfalia T3 models but soon people were asking if we could adapt the kit to suit panel van conversions, naturally we obliged.
The way we got around the lack of factory mounting points was to use universal strengthening plates, it was a solution that worked but could have always been better.
We recently broke a knackered old T3 Caravelle and as some of you know that they had factory seat belt mountings (Models 251 and 252 don’t have factory seatbelt mountings, basically Panel vans where models 253 to 256 Kombi/Caravelle have factory seat belt mountings) so we chopped out the panels and the strengthening, drew them up and sent them off to the machine shop for fabricating.
Naturally with most UK converted “campervans” starting life as basic panel vans they don’t have the factory fitted seatbelt mountings these brackets should help a nice tidy seatbelt install for some customers.
The factory design as been ever so slightly adapted to allow retro fitment without welding and retains the strength that VW built in.

For some reason we’ve sold loads of seatbelts recently but we haven’t been asked to fit any so when we had the opportunity to fit one for a customer the other day it seemed like a perfect opportunity to take a few pictures.

Van was a late Auto-sleeper, obviously we needed to strip out the rear panelling first.

Tools required.

  • Scissors [to cut out the drilling template]
  • Centre punch.
  • Drill
  • 5mm drill bit
  • 17mm drill/hole saw/cone cut.
  • Rivet gun.
T3 Seatbelt template
First start by cutting the template out, there are 2 supplied, one for the left, one for the right. Align the circles on the template with the dimpled in the bodywork.
T3 seatbelt centrepunch.
Centrepunch through the template to mark where to drill the hole for the seatbelt mounting. Yes, we know, there is no template in the picture! I centre punched it lightly and this was me going over the mark.
Drill
Using the 5mm drill, drill out the rearmost dimple, this hole will be used to rivet the plate into place.
Drill drill drill.
….and then drill the centre popped mark.
Punch!
Instead of drilling this hole we used a sheet metal punch that bolts together, the bolt in the middle is tightened and it punches a nice clean hole out. You could use a drill bit, a hole saw or a cone cutter/step drill to do this but please be careful not to mark the panel behind!
Prime and paint.
Once the hole is punched through then prime and paint any bare metal edges.
image
Once the paint is dry it’s time to slide the mounting plate into place. You’ll have to take the rear pillar vent out to do this. Align the plate using the rivet and dimple in the metalwork.
image
View of the riveted plate in situ with the plastic vent removed.
image
View of seatbelt loosly fitted inside the panel.
image
All back together, trim panel fitted and the parcel shelf bracket trimmed for free movement of the belt.

Seatbelt mounting bracket
Seatbelt kit – Rear Left
Seatbelt kit – Rear Right
Seatbelt trim – T3 / T4
Seatbelt mounting bracket – Bulkhead
Outer mounting brackets – Left and Right


How thick is your….

Random question of the morning. A customer looking for a bumper for their T3.
They’ve seen “cheaper” ones (often not much cheaper) and wanted to compare the quality…
We stock the “Heavy Duty” bumpers. They’re the only ones we stock.
The cheaper aftermarket ones are around 1.3mm at their thickest point, these are 3.0mm on the black and 2.5mm on the Chrome.
Originals are around 1.8mm.
Of course that means they’re a bit heavier than the wafer thin ones. Thats no bad thing really.

So… don’t be afraid to ask about the thickness of those parts you’ll be told are “all the same”. All bumpers we’re not created equally, even if the price suggests they were 🙂

Front Bumper
Rear Bumper
Chrome Front Bumper

IMG_20151215_093003

Fuel Tanks… and associated gubbings.

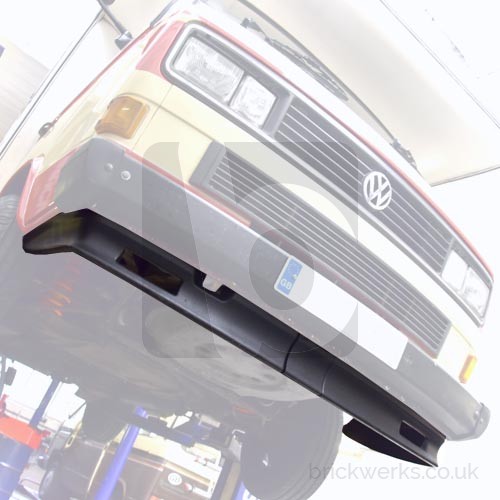
One of the most common enquiries we get is with regard to changing the fuel tank.
T3’s are at that age now where if they are still on the original tank theyre very likely going to need replacing soon. So heres a little bit of information regarding tanks, and the parts that commonly need replacing when we change them.

Firstly, you’re taking the tank out, so whilst you’re doing it take the opportunity to check out whats above it, Clutch pipes, Brake Pipes, Power steering pipes, and the floor of the vehicle itself. If theyre all good, get something on there to protect them so they’ll stay that way!

fueltank

Tanks… there are 3 different tanks. Early, Late, and Fuel Injection.

We’ll start with the Fuel Injection tanks as they’re the simplest.
If you have a fuel injection engine you need a fuel injection tank. This applies to standard engines and engine conversions. The difference is a larger outlet to the pump.

Early tanks were fitted up to 1985, they have a large opening for the filler neck (68mm) and the original filler neck was metal. Petrol, Diesel… all the same (except Fuel Injection!).
If you have a metal filler neck you have an EARLY Tank. Simple.
Well… not quite… see note below.

Late tanks  were fitted 1985 on. Ignoring Fuel Injection engines, they are all the same again for Petrol and Diesel. They had the plastic filler neck and smaller 48mm filler hole.
So, post 1985, plastic filler neck, small hole, carb or Diesel engine… LATE tank


Like most things, its never quite that simple!
At some point after 1985 when VW realised that the metal filler neck wasn’t a great idea (anyone who has had old Golfs or Sciroccos will know all about this!) they stopped supplying a steel filler neck as a replacement part, and instead supplied a later plastic neck with a larger seal to convert the early tank.
What this means is that if you have a metal filler neck you certainly have an early tank, but just because you have a plastic one it doesn’t necessarily follow that you have a late one! The simplest way to tell for sure is to look through the hole in the chassis, you’ll be able to see the rubber seal. If need be, send us a photo and we should be able to ID it.
If you do have an early tank with a plastic filler neck (utilising the larger seal), you’re better off swapping to the late tank and normal seal… why? Simply because the seal is about £5 cheaper 🙂

Okay, that’s the tank out of the way. So what else do you need?
Its a tricky one. We replace a lot of tanks, and a lot of the time the original components can be re-used. A lot of the time some need replacing. Sometimes they all need replacing. Some things might not need replacing, but it kind of makes sense as its all in bits anyway. So, we can’t really tell you exactly what you’ll need… just give you a breakdown of all the parts available.

Well start at the filler neck and work down.
Filler Surround:
https://www.brickwerks.co.uk/index.php/t3-fuel-filler-surround.html
and Seal:
https://www.brickwerks.co.uk/index.php/fuel-filler-neck-rubber-t3.html
Retaining ring for seal (we fit a stainless one, but we also have a cheaper steel one):
https://www.brickwerks.co.uk/index.php/fuel-filler-neck-metal-ring-stainless.html https://www.brickwerks.co.uk/index.php/fuel-filler-neck-metal-ring-steel-with-screws.html
And the hose clip for the neck seal.
https://www.brickwerks.co.uk/index.php/fuel-filler-neck-metal-ring-steel-with-screws.html

Then, to the bottom of the filler neck (The plastic filler neck itself rarely fails and isn’t available):
Early Seal:
https://www.brickwerks.co.uk/index.php/fuel-tank-filler-grommet-t3-early-68mm.html
Late Seal:
https://www.brickwerks.co.uk/index.php/fuel-tank-filler-grommet-late-48mm.html
And the seal to allow a plastic filler neck to be used on an early tank:
https://www.brickwerks.co.uk/index.php/fuel-tank-filler-grommet-t3-convert-early-late.html

Onto the tank itself…
There are 3 grommets in the top of the tank for the breather system. At the time of updating this only aftermarket are available:
https://brickwerks.co.uk/product/breather-grommet-t3-fuel-tank-all-2wd-alternative/
And the breather balance pipe:
https://brickwerks.co.uk/product/fuel-tank-breather-balance-pipe-t3-2wd/
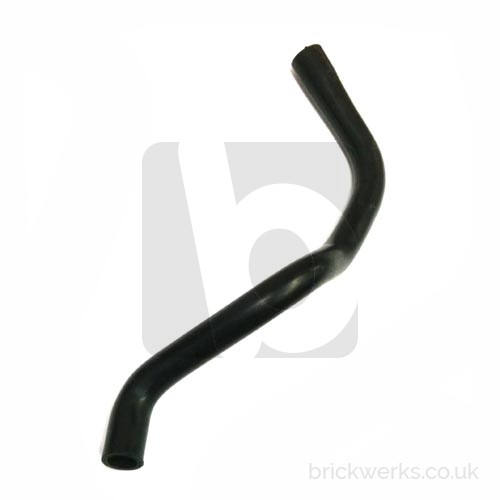
Braided hose from the breather pipe to the arch tanks (1metre will replace them all):
https://www.brickwerks.co.uk/index.php/5-5mm-textile-overbraid-hose.html
or if you want to fit the really good stuff:
https://brickwerks.co.uk/product/fuel-hose-ethanol-bio-safe-5-5mm-2/

Then the sender… 2 options, early and late:
https://www.brickwerks.co.uk/index.php/fuel-level-sender-t3-2wd-upto-1986.html
https://brickwerks.co.uk/product/fuel-level-sender-t3-86/

And the sender seal. Tanks come with a new seal. Throw it away, they’re hard and almost impossible to fit properly. Likewise the seals that come with the level senders.
Often the best seal is the one you remove from the old tank! If you do want to fit a new seal, its this one:
https://www.brickwerks.co.uk/index.php/fuel-level-sender-seal-t3-2wd.html

And that should do you… we’d also recommend something to coat the tank and protect the area above the tank. We use Dintrol, one can should be enough to do the tank and above.

https://www.brickwerks.co.uk/index.php/dinitrol-4941-underbody-sealant-0-5l.html
https://www.brickwerks.co.uk/index.php/dinitrol-4941-underbody-sealant-1-0l.html

As always, our “Early/Late” calculator may help with identifying what you have from your chassis number.

There you go, I dont think we’ve missed anything… theres more you could replace but thats the stuff on the tank itself.


T3 16″ Syncro Brake Back Plates (Also LT 293-296 inc 4×4)

Now in stock, 16″ Syncro rear brake back plates.
Also fit LT 293-296 upto 1993 (4X4 uptp 1991).
They’re handed left/right (as all the back plates are), so of course we stock both sides.
As well as the shoes, Cylinders, and fitting kits to go with them…
We even have the handbrake cables too, and all OEM or Genuine VW.

291609426E

Left Side – Webshop Link
Right Side – Webshop Link